For information about the installation of Gild, please refer to the installation instructions.
No, Gild 2.1.0 is designed to work specifically with Eclipse 3.x. The 1.2.2 version of Gild is designed to work on Eclipse 2.x. Instructions for installing that version of Gild can be found here.
If possible it would be recommended to upgrade your version of Eclipse to version 3 to take advantage of new Gild features.
We have been working on creating an installer for Gild that will work with Mac OS X, but we still have a few issues to resolve. In the meantime, Mac users can follow the manual instructions.
Yes, please follow the manual instructions to install Gild on a system using Linux.
Manual instructions are available for Windows users who are unable to install Gild using the provided installer.
You should be able to open the Gild Perspective by navigating to the following menu location in Eclipse:
Window > Open Perspective > Other
A window should appear with options, including Gild. Select this perspective and select Ok. If the Gild perspective does not appear in the list of perspectives available, try to reinstall Gild. During the installation of Gild, pay close attention to the "Eclipse Install Location", and ensure that this is correct.
There is more to debugging a program in Gild then simply selecting the debug button. Below is a description for how to use the debugger.
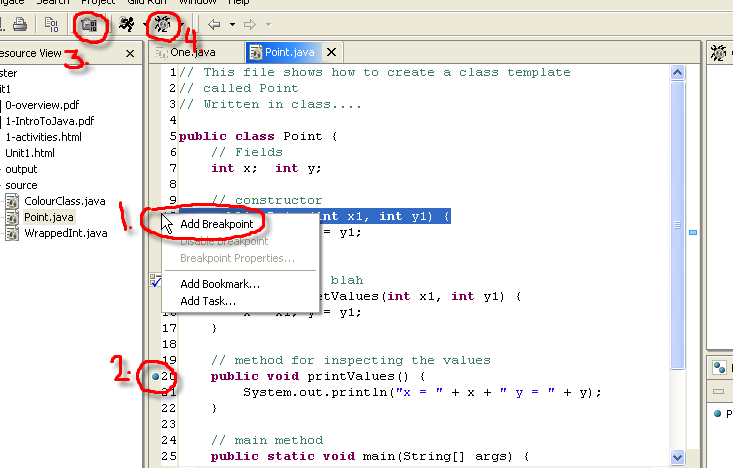
1. In the image below, look for the mouse pointer. This is near the lovely "1." that has been expertly painted on the screen shot. You need to right click somewhere along that column of numbers (or even on the brown-ish part a few millimetres to the left...) When you right click you should get a pop-up as shown in the screen shot. Select "Add Breakpoint" from the pop-up menu.
2. Look at the "2." painted on the screen shot. See the little blue dot? That's a breakpoint and what you should see after you add a breakpoint to a given line. You can add more than one breakpoint in a java file.
3. You now need to build your project. (Even if you did it before you added the breakpoints!) Click on the Build button. (Look for the "3." painted on the screen shot for the location of this button.)
4. You can now debug your project. Click on the debug icon. (Look for the "4." painted on the screen shot for the location of this button.)
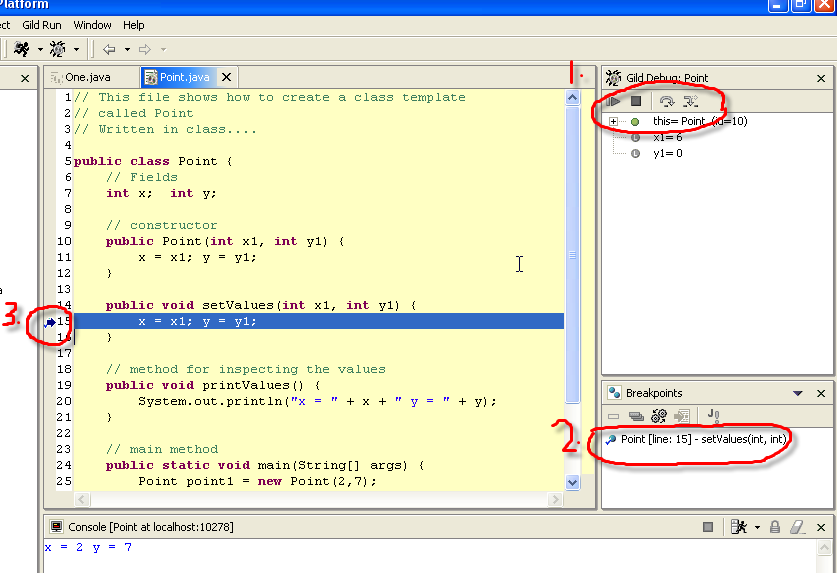
Now, that you have pressed the debug option, you should be in debug mode. The background should change to yellow as a visual indicator for this mode.
1. Look at the "1." painted on the screen shot below. These debug buttons, despite their "greyness" are now active. (Just move your pointer over them and the buttons will pop-up all colourful.)
2. Look at "2.". This is a list of your breakpoints. You can manage your breakpoints here. Just right click on one to do this.
3. Look at "3.". That blue arrow tells you where you are in the execution of the code in your debugging process. The line is also highlighted in blue for additional visibility.
The debugger provides functionality for stepping into code, stepping over code, resuming execution of code (handy for going to the next breakpoint), and terminating the execution of the code.
One way to remove a breakpoint is right click on the breakpoint and select "Remove Breakpoint" from the pop-up menu.
First, make sure your file is a .java file. Gild does not append .java to a file when a new one is created, rather, you must explicitly add .java. (Line numbers will not appear in a non-Java file.) To change a file name so .java is appended, select the file in the Gild Resource View window and right click. The pop-up menu should provide a "Rename" option. You can then add the .java and recompile your project. You may have to close the file and reopen it for the line numbers to appear.
If you don't have line numbers in your editor pane and would like them to be shown, go to Window -> Preferences. In the window that appears, navigate to Gild -> Java. From there you want to select the "Gild Editor has line numbers" checkbox. Finally select Ok or Apply to update your editor pane settings.
Importing and Exporting can be somewhat confusing because of the many different ways that this can be done. Below is a summary of the ways you can import and export your work in Gild:
Export
1. Copy the Eclipse folder from the desktop to somewhere else. (NOTE: In the UVic Computer Science labs, the Eclipse folder should be on your desktop. This is equivalent to the eclipse/workspace folder for a home installation of Eclipse and Gild.)
2. Export your project to a zip file via Gild Resource View->Export (Right-click on a project in the Gild Resource View window and select Export.)
3. Copy folders and files directly from the Desktop/Eclipse/ folder using Windows only. (Without Eclipse/Gild.)
4. Use File->Export which has a multitude of possibilities. (e.g. to export as a .zip file, a JAR file, or a directory, just to name a few.)
Import
1. Copy the Eclipse folder from somewhere else to the desktop.
2. Import your project from a zip file via Gild Resource View->Import
3. Copy folders and files directly to the Desktop/Eclipse/ folder using Windows only. (Without Eclipse/Gild.)
4. Use File->Import which has a multitude of possibilities, some of which cause extremely strange errors.